How-to presentations for EFL classes. A lesson plan (part 2)

How-to presentations is an activity cycle that runs for 2½ homework-classwork sessions:

  1. Homework: listening activity with model text
  2. Class: model text plus presentation scaffolding
  3. Homework: write and practice presentation
  4. Class: deliver presentation
  5. Homework: reflection on presentation

In part 1 of this article I described the first homework assignment (1), which gets students thinking about presentations.

In part 2, I’m going to describe how I model a presentation and then help students begin to put together theirs (steps 2-3).


2. Class: model text plus presentation scaffolding

You can spend the beginning of the next class discussing the listening text ― as should be obvious, it’s a fairly fertile topic for discussion.

Then you drop the bomb: you expect the students to give their own presentations, next class. But to be fair, you’re not going to ask them to do anything you wouldn’t do yourself. You’re going to give your own How-to presentation.

Here’s the plan:

  1. First, ask them what they remember from the listening about the elements of a good presentation. Then, have them pull out the activity and check.
  2. Give the presentation (see below for the text). While listening, students tick off the “best practices” you use.
  3. Give students a gapfill activity with the “transcript” of the talk and check (see below).


Explanation:

The presentation  will model what you expect them to do in the talks, including getting the audience thinking about the topic (or activating schemata, if you will) before the presentation (see part 3 of this series).

I record myself with the built-in voice recorder app on my phone. I strongly encourage you to record yourself giving the presentation, because:

  1. Many students are terrified of speaking in public, but many students are equally (if not more) put off by the idea of recording and then listening to their own voice. I insist my students record themselves; it’s only fair I do as well.
  2. It allows them to see (when comparing it with the pre-typed presentation text) that what you produce in a live presentation often goes off-script. In other words, what matters is the presentation you deliver, not whether you say it word-for-word as written.

At the end of your presentation, ask students to write down what they remember, then check in pairs. Then give them the presentation text gapfill and skim it to check. Finally, ask students to do the gapfill.

Finally, check ― by playing back the recording of your presentation (I use either a mini bluetooth speaker or a USB cable to plug into the TV speakers, but your smartphone might have speakers good enough to project, depending on the size of the classroom).

How smoothly the checking process goes depends on how well you’ve memorized the text. Sometimes I written the key gap-fill vocabulary on a piece of paper as cues. But even if you forgot to say some of the keywords in the presentation you’ve delivered, you can still check together.

Just remember to highlight the difference mentioned above between what you intend to say and what you actually say. As long as you deliver the presentation well, it’s usually only the speaker who knows whether or not the text was delivered faithfully.

Students build their presentations:

With two models provided (especially your second meta-presentation on the thing itself), students should have ample information for how to construct a how-to presentation. I usually ask them to come up with a topic and 5-paragraph plan, if not the full text, in class. In addition to organization issues, my interventions are often to help them construct an introduction – painting the picture.


3. Homework: write and practice presentation

The homework consists in writing up the presentation and emailing it to me for comments and correction. Make sure to give them a tight deadline ― they’ve got to have time between when you email them the corrections/feedback and the next class in order to practice and memorize the presentation.


In the third and final part of this article, I’ll describe steps 4 & 5, or what to do on the day of the presention – self-recording, self-assessment and post-presentation reflection.


Presentation Model:

How to give a good presentation in English

This is the written text of my presentation. Complete the gaps with the words from below. The first one has been done for you.

eyes          delivery                    engaging                   attention             guarantee             repeating             connect              understand          sequencing              improve                  memorable

Today I’m going to talk about how to give a good presentation in English. First, in my talk, I’m going to give you three tips about how you can 1) improve your presentations to make sure you give a presentation that’s interesting, 2)____________ and memorable. So here are my three tips.

The first is that organization is very important. In English we like to have very clear organization to presentations. In the introduction we talk about what we’re going to talk about, and then in the body we talk about the topic itself, and in the conclusion we summarize what we talked about. So it’s a way of both 3)___________ the information and making it clear and easy to understand.

The second tip is to use what’s called “signposting language”. Signposting language is language that helps the audience 4)___________ what’s going to come next, when to pay attention, and to help understand things that they’ve already heard. Some examples of signposting language are introducing something by saying, “Ok, now I’m going to talk about (this).” Other signposting language examples are 5)“_____________ language” to say “First I’m gonna do (this), then I’m gonna do (this), lastly I’m going to do (this)”. Or say, “Now I’ll talk about (this)”. It’s language that’s used to help focus the audience’s 6)___________ on different things.

The last thing that’s important when you’re giving a presentation is the actual physical, 7) ____________ of the presentation. And there’s two things to that. I’d say the first is about speaking. Do you speak in a way that’s clear, slow, easy to understand? And the second is about your body language. Do you look people in the 8)____________? Do you have an open body posture or are you scared and hiding? These things will help your audience—help you 9)__________ with your audience and to make your message clearer.

So, those are my three tips. Remember, organization is important. Use signposting language. And finally, make sure you can deliver your presentation in a way that’s engaging and interesting. If you follow these tips, I 10)___________ that you’ll give better, clearer, more 11)____________ presentations.

First lesson routines: get beyond getting to know you and start building class culture

What is your first class or first lesson for? Getting to know you? Or just getting through the first page of the coursebook? In Planning Lessons and Courses, Tessa Woodward says that first lessons are an opportunity for:

  • Name learning
  • Building a sense of community
  • Understanding student expectations
  • Assessing level

While I agree, I would add three things:

    1. Materials distribution: Decidedly unsexy, but if you’ve got admin duties like passing out coursebooks you’ve got to schedule time for it.
    2. Grammatical or lexical improvement: it might sound obvious, but I have previously been guilty of forgetting that students should both learn and practice new language on Day 1, of forgetting that when students think “What did I learn today?” they’ll be thinking in terms of discrete grammar items (and not in terms of community-building).
    3. Establishing class culture

Number 3, I think, might need some explaining. What is class culture? To paraphrase a great definition from a different context (by Jason Fried, founder of program management app Basecamp), [class] culture is the by-product of consistent behavior. In other words, from how you teach, to what you teach, to how you interact with students and expect them to interact with each other, your class culture will be the result of what you do everyday. Whether your classes are conversation-driven or lockstep by-the-(course)book, whether you’re up scribbling at the whiteboard or hovering over their busily working pairs, whether you’re assigning day one homework or giving them the night off, your first lesson routine should exemplify the principles you teach by. Day one is never a one-off.

And in order to be true to the kind of culture I want to help foster in the classroom, some years ago I decided the best way to start any class is engage with my students, with nothing more than a pen and paper.

My first day routine goes something like this:

PART 1

Take the focus off you with a mingle activity

I really don’t like the me-centric, time-killing forced conversations you go through when waiting for the class to arrive and settle in. So once the proverbial bell rings (or the real one, if you’ve got one), I switch the dynamic, no matter how many students are still missing.

Get up and find three things in common with each of the other people in the class. The following things do not count:

  • anything with the words Italy/Italian
  • evident physical similarities
  • where you live or went to school

Why? I teach mostly monolingual Italians, mostly who come from the provincial city in which I work (which means they mostly go to the same schools). And evident physical similarities ― we both wear glasses, we’re both wearing jeans ― are just too obvious. I want them to dig a little deeper.

“Find X things in common” is great because it forces them to ask questions, and lots of them. And any mingle activity is great because it gives you lots of opportunity to hear them talk, and note down good/improvable language. And as the late arrivals filter in, you can shove them into the mix.

Stop the activity at an appropriate time. While they’re still on their feet, tell them they’re going to have to tell the class what they have in common with other people. And they’re going to have to name names. So give them one last chance to double check names with the people they talked to. Have them sit down. You might want to give them some whole-class feedback about positive/problematic structure, lexis, etc., particularly if you think it will be important in sharing what they have in common. Or you might want to put it on the back burner until later.

Ask everyone to share what they have in common with one other person, introducing that person by name. And tell them to pay attention, because there’ll be a quiz. As the chain of contributions advances, you should repeat the names as much as possible, both for yourself and for the sake of the students.

Finally, quiz them: Who studies Engineering? Who also speaks German? Who went to France for holiday? etc.

PART 2

All about me: getting to know the teacher

Now I give them the chance to do what they’ve been dying to, which is find out something about me, the foreigner.

Now, it’s your turn. You can ask me anything you want. Personal, professional, whatever.

There’s usually a moment of silence as everyone (or at least the most courageous) starts mentally scrambling for what to ask. Then I add:

Ok, I’ll give you some help. You’ll have some time to think of the questions you want to ask, and write down the questions. And you can do it in groups.

Put the students into small groups. You’ll want to have at least two.

Write 5 (or 7, or 10 ― in inverse proportion to the number of groups) questions you want to ask me. But your group is your team. The goal is to ask me the original questions. You get a point for each original question you ask. If they other team thinks of the same question, you don’t get a point.

Why? Because, just like my list of too-obvious similarities, this point-per-original-question system eliminates the usual small-talk list of questions. It will give them some often juicier things to remember about you. And it may reveal a lot about their personalities and preoccupations (I’ve had students ask me things like “How many girlfriends have you had?”)

I will, however, give them another chance at the end to ask me anything that we didn’t talk about during the game (where I’m from, etc.).

When they’ve got their list of questions, I say:

You’re going to ask me your questions. But I’ll only answer “grammatically correct” questions (more on this admittedly problematic term in a future post). Double-check to make sure your questions are grammatically correct.

Give them a few minutes to check their questions again (without asking you for help). As they finish checking, ask each group for a team name. I usually suggest silly American-pro-sports-type names like the Jaguars or the Tigers, but they can choose whatever they want.

Let the teams take turns to ask questions, and after you answer them, award one point per original question. Tell groups to shout out if a group reads a question that they’ve also written (in which case no point is awarded).

Dealing with grammatical incorrectness

The best way to deal with a grammatically incorrect questions is simply don’t hear it: play deaf. What? Sorry? What? Students quickly realize they’ve got to reformulate. Give them a number of chances, then help nudge them in the right direction. Then, after you finally “hear” the question and answer it, ask them to repeat the original (as-written) question again and explain the problem.

Getting beyond accuracy

Some other things I “correct” for are appropriacy, register, intonation and idiomaticity. For example, I make it clear that questions like With whom did you go on holiday? are accurate, but sound strangely formal in spoken English. I also make a point about the inappropriacy of the age question (they always ask). Admittedly, if I’m encouraging students to ask me about my past girlfriends on a first meeting, they might as well as me how old I am, too. But does any adult, in any culture, really ask “How old are you?” ― or volunteer that information ― the first time they meet someone?

You can board the problems in shorthand (pres. perf vs. past simple, preposition position in questions, final -s, etc.). When someone makes a similar mistake, help nudge them toward a better question by referring back to the original group who made and explained the mistake ― and let them re-explain it ― or point to the board to show them the problem.

And by boarding such a list, you’re taking the first steps toward creating the kind of grammatical syllabus that addresses their specific needs, not those simply generalized in a course book list.

Follow up

Once you’ve tallied up the points and declared a winner (even though the focus is clearly on the process, and not winning points, it’s still important to keep up the pretense of the game all the way to the end) the first thing I like to do is see what they remember. I say:

Now, with your partners, quickly write down everything you remember about me.

I like including a step like this in any teacher-class or student-class interaction (like presentations) because it allows them to communicatively and communally (re)construct what they’ve learned. And gives those who may not have been paying attention a chance back in.

You can quickly check a few facts, based on their questions (What did I say my most embarrassing moment was?) or let them quiz the other groups.

Turning on each other

Now tell them they’re going to ask each other the questions they’d written for you. Give them a minute to edit their question list ― if any deal with you explicitly as a foreigner, or based on some specific knowledge ― and rewrite those that would inappropriate for their classmates. You can model and then elicit some changed questions.

Monitor and get whole-class feedback, asking each student to share the two or three most interesting things they learned about their partner.

PART 3

Writing: my personal profile

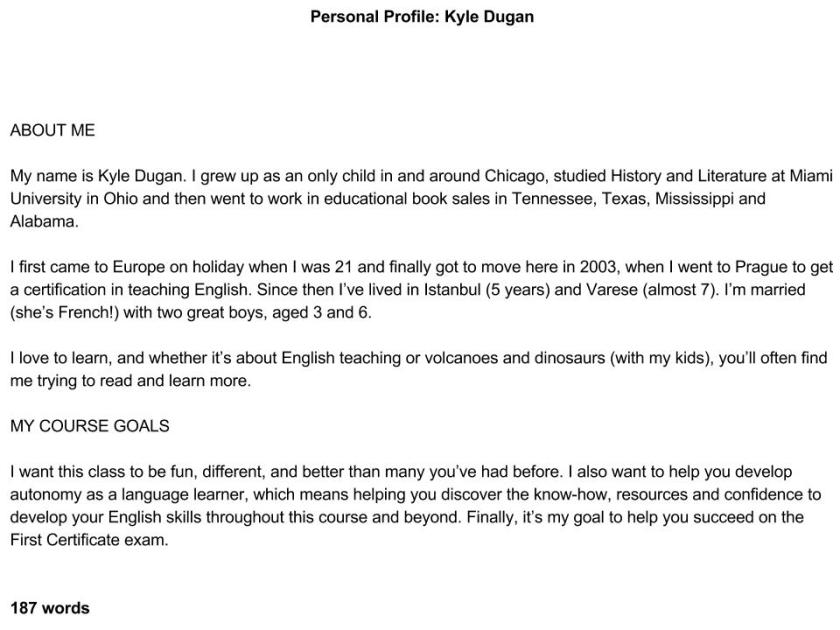
The next step is to get students to write a personal profile. I’ve written my own example as a model. Below is the B2 edition, at Cambridge-First-appropriate 140-190 words. I’ve also got other exam-appropriate editions for other levels. Before giving it to them, I ask:

When would you write a personal profile? (e.g. specific social media contexts)

What info would you include in a personal profile to share with your classmates? (e.g. name, date of birth, reason for taking the class etc.) Board their answers.

Then I hand out my profile:

personal-profile-text-image

I tell students to quickly scan for the information thought they might find. What was included? What wasn’t? Then I ask them to check if I’d answered any of the questions from the getting to know me game.

Writing the student profile

The next step is for students to write their own profiles ― whether in class or at home. To get them prepared for the activity, make sure to highlight:

  • Organization ― paragraphs, headings, title
  • Content ― I want background and course goals, but the specifics are up to them
  • Word count, if relevant

Next steps

What do they do with the profile? I text like this is meant to be read by others, so the worst option for you would be to collect them and comment on them in private. Instead, I’d recommend:

  • Live carrousel: Students tape their completed texts to the wall. The class circulates and reads. I like to have students comment on other texts in some way to generate more discussion. You can have students put their initials next to things they have in common with the writer, or put their initials + a question mark about something they want to ask. When all the texts have been read, the writer takes down his or her profile and then finds the people who’ve written their initials to discuss commonalities or answer questions. As the teacher, you can underline examples of good and problematic language (you didn’t pick up while monitoring the writing phase) to be discussed in group feedback. But don’t forget to put your initials to commonalities first (sometimes it’s easy to forget that the profile was written for a real purpose ― to introduce the writer to you as a reader ― and that you’re more than just a red pen!)
  • Virtual carrousel: Increasingly, I use Google Docs to share class work, and any similar cloud-based document sharing app will do. Essentially, the idea is to have students post their profiles on a shared document, and to leave comments as above. Profile writers can respond in the comments.

Conclusion

As of this writing, that’s my day one routine. Like all great routines, it focuses on the big blocks and leaves lots of room for improvisation where it counts, like getting feedback and working with emergent language (but make sure you plan for the worst, as well). And it, along with my day one reading homework, serves to set expectations for the kind of contributions I expect from the students, and what they can expect from me. And crucially, it’s not a one-off or something to get out of the way, but the foundation for the consistent class culture I hope to establish.

Now, over to you: what’s your day one routine?


References:

Woodward, Terssa. Planning Lessons and Courses. Cambridge University Press, 2001.

Learner-centred teaching from A1: An Olympic Crossword

Crossword A1Hurdles

Since we’re in the midst of the Olympics, yesterday one of my colleagues handed me a crossword with names of Olympic sports and other associated vocab. She’d used it as a filler, but I thought I’d extend it and make a whole lesson out of it.

How? Well I started with a miming game. This entailed hurdling two chairs and nearly doing myself an injury, but gave everyone the giggles and broke the ice for the two new girls who’d joined us today. The students then took turns. Carlos’s ‘equestrian’ was particularly  interesting! In this way, and with the help of Google images, I elicited most of the vocab they’d need to do the crossword, which they then merrily got on with.

I then explained that they were going to make their own crossword about the winter Olympics. At this point there was vociferous protestation from one student ‘Teacher I’m A1 not B1. It’s too difficult!’….and: ‘We’re from Brazil! We not know winter Olympics!’. But I stubbornly soldiered on with my plan. I happen to believe that students are capable of a lot more than they (and we) give them credit for (as I discussed in my IATEFL talk at Birmingham).

I wrote the stages on the board:

  1. Find out about the Winter Olympics.  (using their mobile phones)
  2. Write the questions. Use the crossword we did as a model.
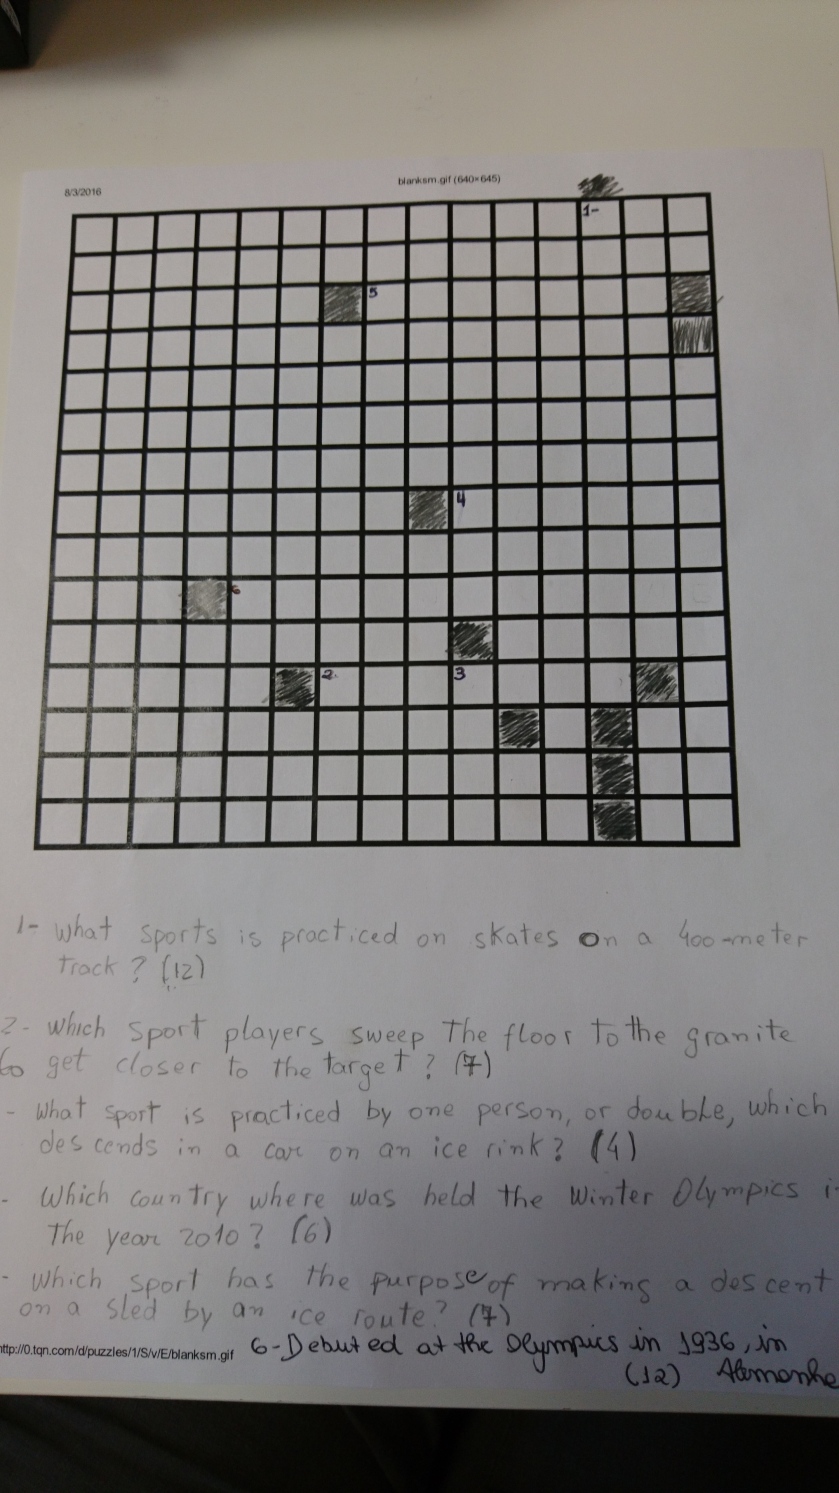
  3. Design your crossword using the grid. Colour the squares at the end of the words. Don’t forget to write the numbers for the questions.

The product

DSC_0020

By the way, for the grid simply Google’crossword grid’.

As you can see, it generated some pretty impressive lexis for A1 learners. One of the girls exhaled a loud ‘phew!’ when they’d finished. It IS hard for them, but achievable if you give the right support. With activities like this, in contrast to using a book or a photocopy, the students do most of the work and are actively engaged with the language, which of course (we hope) makes it more memorable.

The next step is that they swap their crosswords and complete a puzzle created by their classmates. That’s today’s lesson...


Long Live Exam Prep!- Part Minus One: The First Lesson.


Whoops! I really should have started at the beginning. So here’s part ‘Minus One’.

The majority of exam classes (at least in Italy) take place in secondary schools. This post is mainly aimed at teachers of these courses, but could be applied to any exam prep class.

Usually Italian kids who have chosen to do PET / FCE / CAE / IELTS stay on at school after their normal lessons for another couple of hours. You often have a 20 hour course to prepare them for PET, 30 hours for FCE or CAE or IELTS. The students tend not to be from the same class or year group. So some of them know each other and some of them don’t. Sometimes they’ve done a test to establish their level before being accepted on the course…sometimes they haven’t.

What can occur as a result is the stuff of TEFL nightmares.

A scenario

  • You get lost driving to the school because your GPS sent you through a field half way up a mountain. You arrive late.
  • You get to the room and there are no students. You realise you’re in the wrong building (nobody told you there were two buildings!) you run to the other building and you’re even more late.
  • You walk into the building and the caretaker doesn’t know who you are or what course you’re talking about.
  • The caretaker speaks to you in the local dialect and you have no idea what she is talking about
  • The students stand up as you walk in and you look at them blankly because you wonder if they’re going somewhere.
  • You have to give out books and collect money and you forget how many books you have and who’s given you the money and this is all eating away at your lesson time.
  • There’s no IWB.
  • There’s no WiFi.
  • There’s no CD player.
  • There’s only a blackboard and there’s no chalk.
  • You have to try to remember the names of 25 kids, and 5 of them are called Marco.
  • Students come and ask you if they can change classes/how much the course/exam is and you really don’t have a clue (or care! you’re desperately trying to get on with the lesson you’ve planned).
  • You realise you can’t do the Reading part 1 you’d spent hours planning because 10 of them forgot to bring the money for the book.
  • Now you’ve got their attention. They’re sitting in front of you in rows. Nobody says anything in English. There’s a deathly silence that’s making you sweat.
  • A kid at the back says something in a dialect that you don’t understand and everyone laughs. You go the colour of a beetroot and yearn for the green pastures of home.
  • A person (you have no idea who it is, they don’t bother to introduce themselves) walks in and starts talking to the class. They all stand up again. You wonder if it’s a fire drill or something.
  • You ask them to ‘work in pairs’ and they look at you blankly.
  • You realise that two of the students you thought were reading are actually asleep.

A conclusion

After living this scenario (or parts of it) for several years I came to the conclusion that to have a successful first lesson in a state school you should:

  • get there really early
  • move the desks
  • use little or no resources.
  • not rely on any technology
  • get them talking immediately
  • establish appropriate classroom behaviour immediately (working in pairs, speaking in English, level of formality between teacher and student)
  • learn their names as soon as possible
  • make it student focused not book focused
  • not let the pace drop for too long (or they will literally fall asleep)

————-


In Part Minus Two I’ll suggest a handy lesson plan that can be applied to all mainstream exam prep courses B1-C2.